pandas is a great tool to analyze small datasets on a single machine. When the need for bigger datasets arises, users often choose PySpark. However, the converting code from pandas to PySpark is not easy as PySpark APIs are considerably different from pandas APIs. Koalas makes the learning curve significantly easier by providing pandas-like APIs on the top of PySpark. With Koalas, users can take advantage of the benefits of PySpark with minimal efforts, and thus get to value much faster.
A number of blog posts such as Koalas: Easy Transition from pandas to Apache Spark, How Virgin Hyperloop One reduced processing time from hours to minutes with Koalas, and 10 minutes to Koalas in Koalas official docs have demonstrated the ease of conversion between pandas and Koalas. However, despite having the same APIs, there are subtleties when working in a distributed environment that may not be obvious to pandas users. In addition, only about ~70% of pandas APIs are implemented in Koalas. While the open-source community is actively implementing the remaining pandas APIs in Koalas, users would need to use PySpark to work around. Finally, Koalas also offers its own APIs such as to_spark(), DataFrame.map_in_pandas(), ks.sql(), etc. that can significantly improve user productivity.
Therefore, Koalas is not meant to completely replace the needs for learning PySpark. Instead, Koalas makes learning PySpark much easier by offering pandas-like functions. To be proficient in Koalas, users would need to understand the basics of Spark and some PySpark APIs. In fact, we find that users using Koalas and PySpark interchangeably tend to extract the most value from Koalas.
In particular, two types of users benefit the most from Koalas:
- pandas users who want to scale out using PySpark and potentially migrate codebase to PySpark. Koalas is scalable and makes learning PySpark much easier
- Spark users who want to leverage Koalas to become more productive. Koalas offers pandas-like functions so that users don’t have to build these functions themselves in PySpark
This blog post will not only demonstrate how easy it is to convert code written in pandas to Koalas, but also discuss the best practices of using Koalas; when you use Koalas as a drop-in replacement of pandas, how you can use PySpark to work around when the pandas APIs are not available in Koalas, and when you apply Koalas-specific APIs to improve productivity, etc. The example notebook in this blog can be found here.
Distributed and Partitioned Koalas DataFrame
Even though you can apply the same APIs in Koalas as in pandas, under the hood a Koalas DataFrame is very different from a pandas DataFrame. A Koalas DataFrame is distributed, which means the data is partitioned and computed across different workers. On the other hand, all the data in a pandas DataFrame fits in a single machine. As you will see, this difference leads to different behaviors.
Migration from pandas to Koalas
This section will describe how Koalas supports easy migration from pandas to Koalas with various code examples.
Object Creation
The packages below are customarily imported in order to use Koalas. Technically those packages like numpy or pandas are not necessary, but allow users to utilize Koalas more flexibly.
import numpy as np
import pandas as pd
import databricks.koalas as ks
A Koalas Series can be created by passing a list of values, the same way as a pandas Series. A Koalas Series can also be created by passing a pandas Series.
# Create a pandas Series
pser = pd.Series([1, 3, 5, np.nan, 6, 8])
# Create a Koalas Series
kser = ks.Series([1, 3, 5, np.nan, 6, 8])
# Create a Koalas Series by passing a pandas Series
kser = ks.Series(pser)
kser = ks.from_pandas(pser)
Best Practice: As shown below, Koalas does not guarantee the order of indices unlike pandas. This is because almost all operations in Koalas run in a distributed manner. You can use Series.sort_index() if you want ordered indices.
>>> pser
0    1.0
1    3.0
2    5.0
3    NaN
4    6.0
5    8.0
dtype: float64
>>> kser
3    NaN
2    5.0
1    3.0
5    8.0
0    1.0
4    6.0
Name: 0, dtype: float64
# Apply sort_index() to a Koalas series
>>> kser.sort_index()
0    1.0
1    3.0
2    5.0
3    NaN
4    6.0
5    8.0
Name: 0, dtype: float64
A Koalas DataFrame can also be created by passing a NumPy array, the same way as a pandas DataFrame. A Koalas DataFrame has an Index unlike PySpark DataFrame. Therefore, Index of the pandas DataFrame would be preserved in the Koalas DataFrame after creating a Koalas DataFrame by passing a pandas DataFrame.
# Create a pandas DataFrame
pdf = pd.DataFrame({'A': np.random.rand(5),
                    'B': np.random.rand(5)})
# Create a Koalas DataFrame
kdf = ks.DataFrame({'A': np.random.rand(5),
                    'B': np.random.rand(5)})
# Create a Koalas DataFrame by passing a pandas DataFrame
kdf = ks.DataFrame(pdf)
kdf = ks.from_pandas(pdf)
Likewise, the order of indices can be sorted by DataFrame.sort_index().
>>> pdf
          A         B
0  0.015869  0.584455
1  0.224340  0.632132
2  0.637126  0.820495
3  0.810577  0.388611
4  0.037077  0.876712
>>> kdf.sort_index()
          A         B
0  0.015869  0.584455
1  0.224340  0.632132
2  0.637126  0.820495
3  0.810577  0.388611
4  0.037077  0.876712
Viewing Data
As with a pandas DataFrame, the top rows of a Koalas DataFrame can be displayed using DataFrame.head(). Generally, a confusion can occur when converting from pandas to PySpark due to the different behavior of the head() between pandas and PySpark, but Koalas supports this in the same way as pandas by using limit() of PySpark under the hood.
>>> kdf.head(2)
          A         B
0  0.015869  0.584455
1  0.224340  0.632132
A quick statistical summary of a Koalas DataFrame can be displayed using DataFrame.describe().
>>> kdf.describe()
              A         B
count  5.000000  5.000000
mean   0.344998  0.660481
std    0.360486  0.195485
min    0.015869  0.388611
25%    0.037077  0.584455
50%    0.224340  0.632132
75%    0.637126  0.820495
max    0.810577  0.876712
Sorting a Koalas DataFrame can be done using DataFrame.sort_values().
>>> kdf.sort_values(by='B')
          A         B
3  0.810577  0.388611
0  0.015869  0.584455
1  0.224340  0.632132
2  0.637126  0.820495
4  0.037077  0.876712
Transposing a Koalas DataFrame can be done using DataFrame.transpose().
>>> kdf.transpose()
          0         1         2         3         4
A  0.015869  0.224340  0.637126  0.810577  0.037077
B  0.584455  0.632132  0.820495  0.388611  0.876712
Best Practice: DataFrame.transpose() will fail when the number of rows is more than the value of compute.max_rows, which is set to 1000 by default. This is to prevent users from unknowingly executing expensive operations. In Koalas, you can easily reset the default compute.max_rows. See the official docs for DataFrame.transpose() for more details.
>>> from databricks.koalas.config import set_option, get_option
>>> ks.get_option('compute.max_rows')
1000
>>> ks.set_option('compute.max_rows', 2000)
>>> ks.get_option('compute.max_rows')
2000
Selecting or Accessing Data
As with a pandas DataFrame, selecting a single column from a Koalas DataFrame returns a Series.
>>> kdf['A']  # or kdf.A
0    0.015869
1    0.224340
2    0.637126
3    0.810577
4    0.037077
Name: A, dtype: float64
Selecting multiple columns from a Koalas DataFrame returns a Koalas DataFrame.
>>> kdf[['A', 'B']]
          A         B
0  0.015869  0.584455
1  0.224340  0.632132
2  0.637126  0.820495
3  0.810577  0.388611
4  0.037077  0.876712
Slicing is available for selecting rows from a Koalas DataFrame.
>>> kdf.loc[1:2]
          A         B
1  0.224340  0.632132
2  0.637126  0.820495
Slicing rows and columns is also available.
>>> kdf.iloc[:3, 1:2]
          B
0  0.584455
1  0.632132
2  0.820495
Best Practice: By default, Koalas disallows adding columns coming from different DataFrames or Series to a Koalas DataFrame as adding columns requires join operations which are generally expensive. This operation can be enabled by setting compute.ops_on_diff_frames to True. See Available options in the docs for more detail.
>>> kser = ks.Series([100, 200, 300, 400, 500], index=[0, 1, 2, 3, 4])
>>> kdf['C'] = kser


...
ValueError: Cannot combine the series or dataframe because it comes from a different dataframe. In order to allow this operation, enable 'compute.ops_on_diff_frames' option.
# Those are needed for managing options
>>> from databricks.koalas.config import set_option, reset_option
>>> set_option("compute.ops_on_diff_frames", True)
>>> kdf['C'] = kser
# Reset to default to avoid potential expensive operation in the future
>>> reset_option("compute.ops_on_diff_frames")
>>> kdf
          A         B    C
0  0.015869  0.584455  100
1  0.224340  0.632132  200
3  0.810577  0.388611  400
2  0.637126  0.820495  300
4  0.037077  0.876712  500
Applying a Python Function to Koalas DataFrame
DataFrame.apply() is a very powerful function favored by many pandas users. Koalas DataFrames also support this function.
>>> kdf.apply(np.cumsum)
          A         B     C
0  0.015869  0.584455   100
1  0.240210  1.216587   300
3  1.050786  1.605198   700
2  1.687913  2.425693  1000
4  1.724990  3.302404  1500
DataFrame.apply() also works for axis = 1 or ‘columns’ (0 or ‘index’ is the default).
>>> kdf.apply(np.cumsum, axis=1)
          A         B           C
0  0.015869  0.600324  100.600324
1  0.224340  0.856472  200.856472
3  0.810577  1.199187  401.199187
2  0.637126  1.457621  301.457621
4  0.037077  0.913788  500.913788
Also, a Python native function can be applied to a Koalas DataFrame.
>>> kdf.apply(lambda x: x ** 2)
          A         B       C
0  0.000252  0.341588   10000
1  0.050329  0.399591   40000
3  0.657035  0.151018  160000
2  0.405930  0.673212   90000
4  0.001375  0.768623  250000
Best Practice: While it works fine as it is, it is recommended to specify the return type hint for Spark’s return type internally when applying user defined functions to a Koalas DataFrame. If the return type hint is not specified, Koalas runs the function once for a small sample to infer the Spark return type which can be fairly expensive.
>>> def square(x) -> ks.Series[np.float64]:
...     return x ** 2
>>> kdf.apply(square)
          A         B         C
0  0.405930  0.673212   90000.0
1  0.001375  0.768623  250000.0
2  0.000252  0.341588   10000.0
3  0.657035  0.151018  160000.0
4  0.050329  0.399591   40000.0
Note that DataFrame.apply() in Koalas does not support global aggregations by its design. However, If the size of data is lower than compute.shortcut_limit, it might work because it uses pandas as a shortcut execution.
# Working properly since size of data <= compute.shortcut_limit (1000)
>>> ks.DataFrame({'A': range(1000)}).apply(lambda col: col.max())
A    999
Name: 0, dtype: int64
# Not working properly since size of data > compute.shortcut_limit (1000)
>>> ks.DataFrame({'A': range(1001)}).apply(lambda col: col.max())
A     165
A     580
A     331
A     497
A     829
A     414
A     746
A     663
A     912
A    1000
A     248
A      82
Name: 0, dtype: int64
Best Practice: In Koalas, compute.shortcut_limit (default = 1000) computes a specified number of rows in pandas as a shortcut when operating on a small dataset. Koalas uses the pandas API directly in some cases when the size of input data is below this threshold. Therefore, setting this limit too high could slow down the execution or even lead to out-of-memory errors. The following code example sets a higher compute.shortcut_limit, which then allows the previous code to work properly. See the Available options for more details.
>>> ks.set_option('compute.shortcut_limit', 1001)
>>> ks.DataFrame({'A': range(1001)}).apply(lambda col: col.max())
A    1000
Name: 0, dtype: int64
Grouping Data
Grouping data by columns is one of the common APIs in pandas. DataFrame.groupby() is available in Koalas as well.
>>> kdf.groupby('A').sum()
                 B    C
A
0.224340  0.632132  200
0.637126  0.820495  300
0.015869  0.584455  100
0.810577  0.388611  400
0.037077  0.876712  500
See also grouping data by multiple columns below.
>>> kdf.groupby(['A', 'B']).sum()
                     C
A        B
0.224340 0.632132  200
0.015869 0.584455  100
0.037077 0.876712  500
0.810577 0.388611  400
0.637126 0.820495  300
Plotting and Visualizing Data
In pandas, DataFrame.plot is a good solution for visualizing data. It can be used in the same way in Koalas.
Note that Koalas leverages approximation for faster rendering. Therefore, the results could be slightly different when the number of data is larger than plotting.max_rows.
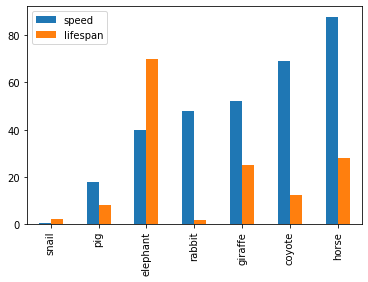
See the example below that plots a Koalas DataFrame as a bar chart with DataFrame.plot.bar().
>>> speed = [0.1, 17.5, 40, 48, 52, 69, 88]
>>> lifespan = [2, 8, 70, 1.5, 25, 12, 28]
>>> index = ['snail', 'pig', 'elephant',
...          'rabbit', 'giraffe', 'coyote', 'horse']
>>> kdf = ks.DataFrame({'speed': speed,
...                     'lifespan': lifespan}, index=index)
>>> kdf.plot.bar()
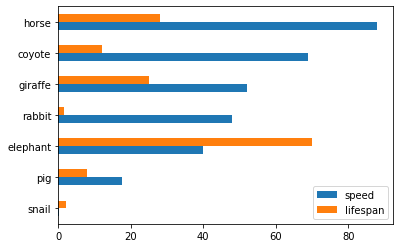
Also, The horizontal bar plot is supported with DataFrame.plot.barh()
>>> kdf.plot.barh()
Make a pie plot using DataFrame.plot.pie().
>>> kdf = ks.DataFrame({'mass': [0.330, 4.87, 5.97],
...                     'radius': [2439.7, 6051.8, 6378.1]},
...                    index=['Mercury', 'Venus', 'Earth'])
>>> kdf.plot.pie(y='mass')
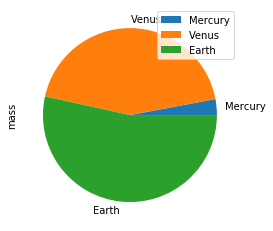
Best Practice: For bar and pie plots, only the top-n-rows are displayed to render more efficiently, which can be set by using option plotting.max_rows.
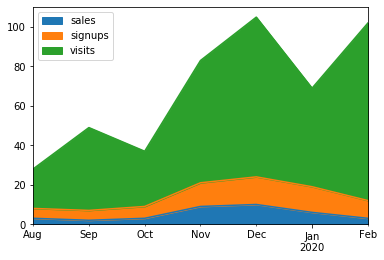
Make a stacked area plot using DataFrame.plot.area().
>>> kdf = ks.DataFrame({
...     'sales': [3, 2, 3, 9, 10, 6, 3],
...     'signups': [5, 5, 6, 12, 14, 13, 9],
...     'visits': [20, 42, 28, 62, 81, 50, 90],
... }, index=pd.date_range(start='2019/08/15', end='2020/03/09',
...                        freq='M'))
>>> kdf.plot.area()
Make line charts using DataFrame.plot.line().
>>> kdf = ks.DataFrame({'pig': [20, 18, 489, 675, 1776],
...                     'horse': [4, 25, 281, 600, 1900]},
...                    index=[1990, 1997, 2003, 2009, 2014])
>>> kdf.plot.line()
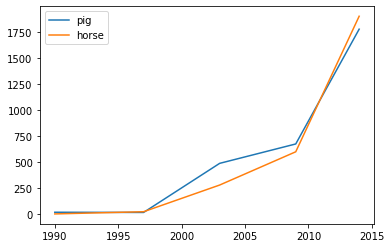
Best Practice: For area and line plots, the proportion of data that will be plotted can be set by plotting.sample_ratio. The default is 1000, or the same as plotting.max_rows. See Available options for details.
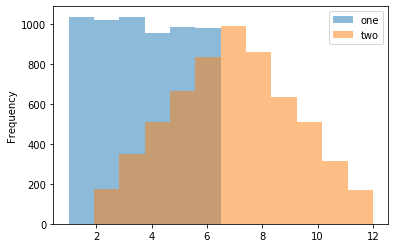
Make a histogram using DataFrame.plot.hist()
>>> kdf = pd.DataFrame(
...     np.random.randint(1, 7, 6000),
...     columns=['one'])
>>> kdf['two'] = kdf['one'] + np.random.randint(1, 7, 6000)
>>> kdf = ks.from_pandas(kdf)
>>> kdf.plot.hist(bins=12, alpha=0.5)
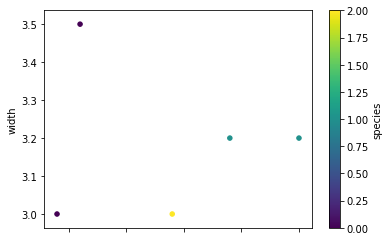
Make a scatter plot using DataFrame.plot.scatter()
>>> kdf = ks.DataFrame([[5.1, 3.5, 0], [4.9, 3.0, 0], [7.0, 3.2, 1],
...                     [6.4, 3.2, 1], [5.9, 3.0, 2]],
...                    columns=['length', 'width', 'species'])
>>> kdf.plot.scatter(x='length', y='width', c='species', colormap='viridis')
Missing Functionalities and Workarounds in Koalas
When working with Koalas, there are a few things to look out for. First, not all pandas APIs are currently available in Koalas. Currently, about ~70% of pandas APIs are available in Koalas. In addition, there are subtle behavioral differences between Koalas and pandas, even if the same APIs are applied. Due to the difference, it would not make sense to implement certain pandas APIs in Koalas. This section discusses common workarounds.
Using pandas APIs via Conversion
When dealing with missing pandas APIs in Koalas, a common workaround is to convert Koalas DataFrames to pandas or PySpark DataFrames, and then apply either pandas or PySpark APIs. Converting between Koalas DataFrames and pandas/PySpark DataFrames is pretty straightforward: DataFrame.to_pandas() and koalas.from_pandas() for conversion to/from pandas; DataFrame.to_spark() and DataFrame.to_koalas() for conversion to/from PySpark. However, if the Koalas DataFrame is too large to fit in one single machine, converting to pandas can cause an out-of-memory error.
Following code snippets shows a simple usage of DataFrame.to_pandas().
>>> kidx = kdf.index
>>> kidx.to_list()

...
PandasNotImplementedError: The method `pd.Index.to_list()` is not implemented. If you want to collect your data as an NumPy array, use 'to_numpy()' instead.
Best Practice: Index.to_list() raises PandasNotImplementedError. Koalas does not support this because it requires collecting all data into the client (driver node) side. A simple workaround is to convert to pandas using to_pandas().
>>> kidx.to_pandas().to_list()
[0, 1, 2, 3, 4]
Native Support for pandas Objects
Koalas has also made available the native support for pandas objects. Koalas can directly leverage pandas objects as below.
>>> kdf = ks.DataFrame({'A': 1.,
...                     'B': pd.Timestamp('20130102'),
...                     'C': pd.Series(1, index=list(range(4)), dtype='float32'),
...                     'D': np.array([3] * 4, dtype='int32'),
...                     'F': 'foo'})
>>> kdf
     A          B    C  D    F
0  1.0 2013-01-02  1.0  3  foo
1  1.0 2013-01-02  1.0  3  foo
2  1.0 2013-01-02  1.0  3  foo
3  1.0 2013-01-02  1.0  3  foo
ks.Timestamp() is not implemented yet, and ks.Series() cannot be used in the creation of Koalas DataFrame. In these cases, the pandas native objects pd.Timestamp() and pd.Series() can be used instead.
Distributing a pandas Function in Koalas
In addition, Koalas offers Koalas-specific APIs such as DataFrame.map_in_pandas(), which natively support distributing a given pandas function in Koalas.
>>> i = pd.date_range('2018-04-09', periods=2000, freq='1D1min')
>>> ts = ks.DataFrame({'A': ['timestamp']}, index=i)
>>> ts.between_time('0:15', '0:16')


...
PandasNotImplementedError: The method `pd.DataFrame.between_time()` is not implemented yet.
DataFrame.between_time() is not yet implemented in Koalas. As shown below, a simple workaround is to convert to a pandas DataFrame using to_pandas(), and then applying the function.
>>> ts.to_pandas().between_time('0:15', '0:16')
                             A
2018-04-24 00:15:00  timestamp
2018-04-25 00:16:00  timestamp
2022-04-04 00:15:00  timestamp
2022-04-05 00:16:00  timestamp
However, DataFrame.map_in_pandas() is a better alternative workaround because it does not require moving data into a single client node and potentially causing out-of-memory errors.
>>> ts.map_in_pandas(func=lambda pdf: pdf.between_time('0:15', '0:16'))
                             A
2022-04-04 00:15:00  timestamp
2022-04-05 00:16:00  timestamp
2018-04-24 00:15:00  timestamp
2018-04-25 00:16:00  timestamp
Best Practice: In this way, DataFrame.between_time(), which is a pandas function, can be performed on a distributed Koalas DataFrame because DataFrame.map_in_pandas() executes the given function across multiple nodes. See DataFrame.map_in_pandas().
Using SQL in Koalas
Koalas supports standard SQL syntax with ks.sql() which allows executing Spark SQL query and returns the result as a Koalas DataFrame.
>>> kdf = ks.DataFrame({'year': [1990, 1997, 2003, 2009, 2014],
...                     'pig': [20, 18, 489, 675, 1776],
...                     'horse': [4, 25, 281, 600, 1900]})
>>> ks.sql("SELECT * FROM {kdf} WHERE pig > 100")
   year   pig  horse
0  1990    20      4
1  1997    18     25
2  2003   489    281
3  2009   675    600
4  2014  1776   1900
Also, mixing Koalas DataFrame and pandas DataFrame is supported in a join operation.
>>> pdf = pd.DataFrame({'year': [1990, 1997, 2003, 2009, 2014],
...                     'sheep': [22, 50, 121, 445, 791],
...                     'chicken': [250, 326, 589, 1241, 2118]})
>>> ks.sql('''
...     SELECT ks.pig, pd.chicken
...     FROM {kdf} ks INNER JOIN {pdf} pd
...     ON ks.year = pd.year
...     ORDER BY ks.pig, pd.chicken''')
    pig  chicken
0    18      326
1    20      250
2   489      589
3   675     1241
4  1776     2118
Working with PySpark
You can also apply several PySpark APIs on Koalas DataFrames. PySpark background can make you more productive when working in Koalas. If you know PySpark, you can use PySpark APIs as workarounds when the pandas-equivalent APIs are not available in Koalas. If you feel comfortable with PySpark, you can use many rich features such as the Spark UI, history server, etc.
Conversion from and to PySpark DataFrame
A Koalas DataFrame can be easily converted to a PySpark DataFrame using DataFrame.to_spark(), similar to DataFrame.to_pandas(). On the other hand, a PySpark DataFrame can be easily converted to a Koalas DataFrame using DataFrame.to_koalas(), which extends the Spark DataFrame class.
>>> kdf = ks.DataFrame({'A': [1, 2, 3, 4, 5], 'B': [10, 20, 30, 40, 50]})
>>> sdf = kdf.to_spark()
>>> type(sdf)
pyspark.sql.dataframe.DataFrame
>>> sdf.show()
+---+---+
|  A|  B|
+---+---+
|  1| 10|
|  2| 20|
|  3| 30|
|  4| 40|
|  5| 50|
+---+---+
Note that converting from PySpark to Koalas can cause an out-of-memory error when the default index type is sequence. Default index type can be set by compute.default_index_type (default = sequence). If the default index must be the sequence in a large dataset, distributed-sequence should be used.
>>> from databricks.koalas import option_context
>>> with option_context(
...         "compute.default_index_type", "distributed-sequence"):
...     kdf = sdf.to_koalas()
>>> type(kdf)
databricks.koalas.frame.DataFrame
>>> kdf
   A   B
3  4  40
1  2  20
2  3  30
4  5  50
0  1  10
Best Practice: Converting from a PySpark DataFrame to Koalas DataFrame can have some overhead because it requires creating a new default index internally – PySpark DataFrames do not have indices. You can avoid this overhead by specifying the column that can be used as an index column. See the Default Index type for more detail.
>>> sdf.to_koalas(index_col='A')
    B
A
1  10
2  20
3  30
4  40
5  50
Checking Spark’s Execution Plans
DataFrame.explain() is a useful PySpark API and is also available in Koalas. It can show the Spark execution plans before the actual execution. It helps you understand and predict the actual execution and avoid the critical performance degradation.
from databricks.koalas import option_context

with option_context(
        "compute.ops_on_diff_frames", True,
        "compute.default_index_type", 'distributed'):
    df = ks.range(10) + ks.range(10)
    df.explain()
The command above simply adds two DataFrames with the same values. The result is shown below.
== Physical Plan ==
*(5) Project [...]
+- SortMergeJoin [...], FullOuter
   :- *(2) Sort [...], false, 0
   :  +- Exchange hashpartitioning(...), [id=#]
   :     +- *(1) Project [...]
   :        +- *(1) Range (0, 10, step=1, splits=12)
   +- *(4) Sort [...], false, 0
      +- ReusedExchange [...], Exchange hashpartitioning(...), [id=#]
As shown in the physical plan, the execution will be fairly expensive because it will perform the sort merge join to combine DataFrames. To improve the execution performance, you can reuse the same DataFrame to avoid the merge. See Physical Plans in Spark SQL to learn more.
with option_context(
        "compute.ops_on_diff_frames", False,
        "compute.default_index_type", 'distributed'):
    df = ks.range(10)
    df = df + df
    df.explain()
Now it uses the same DataFrame for the operations and avoids combining different DataFrames and triggering a sort merge join, which is enabled by compute.ops_on_diff_frames.
== Physical Plan ==
*(1) Project [...]
+- *(1) Project [...]
   +- *(1) Range (0, 10, step=1, splits=12)
This operation is much cheaper than the previous one while producing the same output. Examine DataFrame.explain() to help improve your code efficiency.
Caching DataFrame
DataFrame.cache() is a useful PySpark API and is available in Koalas as well. It is used to cache the output from a Koalas operation so that it would not need to be computed again in the subsequent execution. This would significantly improve the execution speed when the output needs to be accessed repeatedly.
with option_context("compute.default_index_type", 'distributed'):
    df = ks.range(10)
    new_df = (df + df).cache()  # `(df + df)` is cached here as `df`
    new_df.explain()
As the physical plan shows below, new_df will be cached once it is executed.
== Physical Plan ==
*(1) InMemoryTableScan [...]
   +- InMemoryRelation [...], StorageLevel(...)
      +- *(1) Project [...]
         +- *(1) Project [...]
            +- *(1) Project [...]
               +- *(1) Range (0, 10, step=1, splits=12)
InMemoryTableScan and InMemoryRelation mean the new_df will be cached – it does not need to perform the same (df + df) operation when it is executed the next time.
A cached DataFrame can be uncached by DataFrame.unpersist().
new_df.unpersist()
Best Practice: A cached DataFrame can be used in a context manager to ensure the cached scope against the DataFrame. It will be cached and uncached back within the with scope.
with (df + df).cache() as df:
    df.explain()
Conclusion
The examples in this blog demonstrate how easily you can migrate your pandas codebase to Koalas when working with large datasets. Koalas is built on top of PySpark, and provides the same API interface as pandas. While there are subtle differences between pandas and Koalas, Koalas provides additional Koalas-specific functions to make it easy when working in a distributed setting. Finally, this blog shows common workarounds and best practices when working in Koalas. For pandas users who need to scale out, Koalas fits their needs nicely.
Get Started with Koalas on Apache Spark
You can get started with trying examples in this blog in this notebook, visit the Koalas documentation and peruse examples, and contribute at Koalas GitHub. Also, join the koalas-dev mailing list for discussions and new release announcements.
References
출처 :